Showing posts with label Edwina's posts. Show all posts

Saturday, 1 October 2011

How to Make Jelly-Fish Lanterns

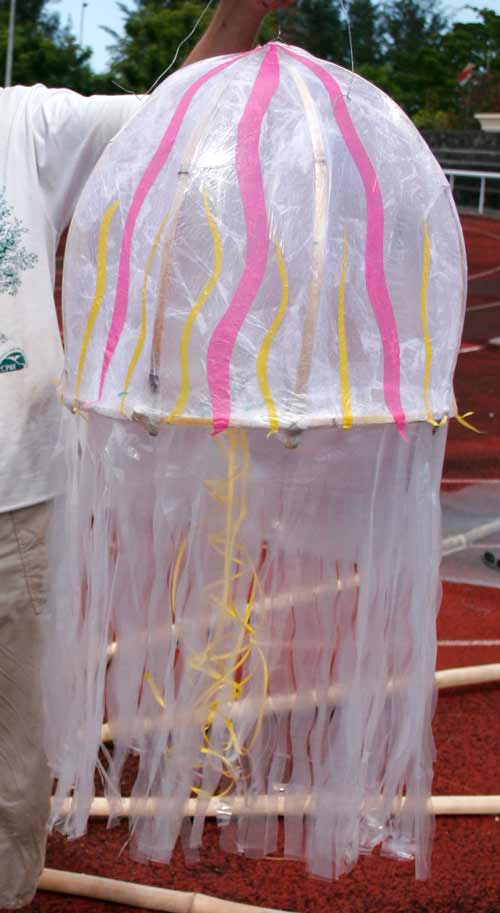
Large Jelly fish lantern. Photo by Y. Gomez
I’ve written previously about how to make fish lanterns, now it's time to make jelly-fish lanterns!


At the time, the jelly-fish idea was a response to the following: 
  • How to make fishy-themed lanterns with a very simple shape (we had to make a lot very quickly, with the help of children.)
  • And how to recycle a lot of plastic bags.  The football field the show was being performed on had been covered in blue tarpaulins (to make it look like the sea), and they’d all come in plastic bags that looked ripe for re-use.
Although we used split green bamboo, you will be able to follow this design exactly using willow withies which are more readily available for a lot of people.  Here’s a few links to suppliers in the UK, but search for buff willow, or willow withies and you’ll find them.


Soak the willow for 2-4 hours to help with flexibility.
Splitting bamboo. Photo by Y. Gomez
If you want to use bamboo, it must be relatively freshly cut, and split down its length to give you long thin strips about 1cm (3/4 in) wide.  If splitting the bamboo with a machete be careful of your hands and arms – bamboo can be very sharp (and so can the machete!)  A huge thank you to all those people who split the bamboo for us (Louis particularly!) – we couldn’t have done it without you!

You will need:
  • A small amount of chicken wire or small shallow tin can.
  • Pliers and wire cutters
  • Small tinfoil pie cases or tinfoil.
  • Willow withies or split green bamboo.
  • Thin wire
  • Masking tape and clear tape (eg sellotape)
  • Secateurs or something else to cut the withies.
  • Scissors
  • Cling film
  • PVA glue (non-washable) watered down so it can penetrate the tissue paper
  • An old paint brush to apply the glue.
  • Wet strength tissue paper, about 2-3 sheets per jellyfish, but it depends on how big the jellyfish is!
  • Tealight candle or other light source (eg glow stick, LED pushlight, torch.)
  • An old bit of plastic to cut up for the tentacles.
Candle holder
Candle holder: 
Make your candle holder first. (An old (washed) sardine tin works well, but we made ours from chicken wire as it was easier to get hold of.)  This bit isn’t recommended for kids as the wire can be sharp.

Make a small cylinder shape from chicken wire and attach the ends together so the shape doesn’t spring apart - Use wire or just bend over parts of the chicken wire.  Snip the chicken wire apart, from the bottom of the cylinder upwards about a third, and bend some of these bits inwards to create a bottom and some outwards to create ‘legs’.

Put a tinfoil pie case in the bottom or just create a lining at the bottom with tinfoil – this is to stop any wax from dripping out of the bottom of the lantern. Set to one side and make the frame.


The first ring - this is the base of the body
Making the lantern frame:  
Make a ring with withies/bamboo that is going to be the base of the jelly fish lantern body.  Ours averaged about 25 - 30cm (12in) in diameter (so use a withy that is roughly a metre long (approx. 40 inches)  (Although the one in the first picture is much bigger than that).

Overlap the ends of the withies/bamboo and tape with masking tape to hold.
Add a cross, to fit the candle holder onto later
Add a cross of withies/bamboo on top of the ring and tape in place.

Start making the body shape
Cut 3 or 4 lengths of withy/bamboo that will make the shape of the body.  Our lengths were about 60cm (24in) long.  Attach one end to the edge of the frame, then curve it to attach the other end to the opposite side of the ring.
Work your way round until all the body bits are attached.
Repeat until you've attached all your body-pieces, keeping them evenly spaced around around the ring.

Fit candle holder
Fix the candle holder to the cross of the base by folding its ‘feet’ under the withies/bamboo.  Use extra wire if it looks a bit wobbly.  Try not to have any wire poking out anywhere as you will eventually put your candle in from underneath.  I must admit, you can wait to do this bit last if you want, you'll see in some of the subsequent photos that we're putting the cling film on and the candle holder is nowhere to be seen.  Out of preference I would do it at this stage, but it's not essential.
Fatima putting cling film on a nice big jelly fish! Photo byY. Gomez

That's me, helping with the cling film.  Photo byY. Gomez
Covering the frame:   
When working with small or inexperienced hands, I find it useful to cover the frame with cling film first, before covering with tissue paper.  This just gives a base to attach the tissue paper to, but is not strictly necessary.  Adults may want to help with this bit!  Make sure there’s no cling film bits dangling inside the lantern that may melt in the candle-flame, pat it all flat on the inside.

Getting the paste on, lots of messy fun!.  Photo by Y. Gomez
Then the messy part begins!  Tear the tissue paper into pieces small enough for your lantern and set aside. Water down pva glue and use old paint brushes to apply it to the tissue paper.

Stick it onto the lantern overlapping the edges of each piece until the whole lantern is covered.
It’s best to use white tissue paper for a base and add a few colours on top of that, rather than do the whole thing in colour – it helps the light transmission.
Adding the finishing touches. Photo by Y. Gomez
Once all your jelly-fish patterns are applied, leave it to dry.

Now is a good time to cut up the plastic you have to make the tentacles.  Cut it in thin strips, but not all the way through.  Leave about 25mm (1in) at one edge that will keep the whole thing together so you can attach it to the lantern as one big fringe.  Then (obviously) attach it to the base ring of the lantern.  Clear tape works well.
Cut vent holes:
If you’re using real candles for your light source, cut out a few small holes above the candle holder, (on top of the jelly-fish’s head) to provide a vent hole for the heat to escape.  Scissors or a sharp knife works fine.  
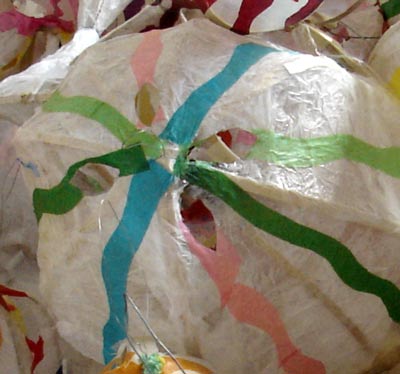
Vent holes for the heat to escape.
And finally, add a handle by attaching wire to the top withies/bamboo, and insert a lit candle from underneath, by dropping it into the candle holder.  If you struggle getting the candle in, you can cut a little ‘door’ in the side and then just tape it closed with clear tape.
As with all candles, it’s best not to leave them unattended, especially if the lanterns are being carried by children.

Other light sources, like torches or glow sticks can be hung from the frame on the inside.
Some finished jelly fish lanterns.
Lighting the candles backstage before the show. Photo by Y. Gomez
Poster for the Kreol Festival Seychelles, 2005
Lastly a huge thank you to all the people that helped us make and light the 200 lanterns for this opening show of the Kreol Festival, it would not have been so spectacular without you!
submit to reddit

Wednesday, 14 September 2011

How to make Fish Lanterns

How to make Fish Lanterns
Fish lanterns
(Scroll down for materials list and instructions)

In 2005 I was asked to go to the Seychelles to help with the opening ceremony of the Kreol Festival.
 
Our giant sun hanging from the largest crane on the island.
Between me and another artist, the late Paul Flack, we were asked to produce a giant 30ft sun that rose on a crane to mark the start and finish of the show (see pic), and 200 lanterns that would be held by children dancing in the show.  

 Lanterns are a fast and fun project, once you have the basic materials, but in a foreign country that can prove a bit of a challenge.

In the UK I’d usually use willow to make this kind of thing, but out in the Seychelles we had to experiment with different materials.  It’s a small island nation and there are no big DIY or art shops to get materials.   

The laborious process of splitting the bamboo - willow is much easier to use if available!
We ended up harvesting green bamboo from the jungle and one of the locals split it down with a machete for us into useable strips.  The bamboo dries out quite quickly in the tropical heat, so we had to cover it and keep it in the shade before working with it.  

You will be able to follow this design exactly in willow withies however, which are more available in western countries, I would use buff willow if available (soak for 2-4 hours for maximum flexibility) or green willow (soak for 3-5 days, yes, that is days – fine if you have a pond or an old bath you can dump it in, but otherwise a bit troublesome).  

Buff willow is available from here: http://www.willowgrowers.co.uk/cat/18/buff-willow, but there's plenty of other suppliers online.

We worked with some of the kids who were in the show to make the lanterns, so the designs were simplified and the techniques made a bit more friendly for little hands.  It was an underwater theme so the first lantern we made was a fish, which I’ll describe here.  We also made jellyfish, starfish and a shark.  I'll breakdown the jellyfish lanten in a future tutorial as well.

We were able, in the absence of over zealous health and safety officials, to use actual tealight candles in these lanterns.  But if you’re faced with such challenges you can always use a torch, or other battery operated lightsource, or glowsticks.  Battery operated flickering candles are available but I think they’re expensive and don’t really give out a lot of light.

You will need:
  • A small amount of chicken wire or small shallow tin can.
  • Pliers and wire cutters
  • A small tinfoil pie case or tinfoil.
  • Willow withies or split green bamboo.
  • Thin wire
  • Masking tape
  • Secateurs or something else to cut the withies.
  • Scissors
  • Cling film
  • PVA glue (non-washable) watered down so it can penetrate the tissue paper
  • Wet strength tissue paper, about 3-4 sheets per fish, but it depends on how big the fish is!
  • Tealight candle or other light source (and a lighter!).
Make your candle holder first. ( An old (washed) sardine tin works well, but trying to get 200 at short notice in a foreign country wasn’t very easy so we made ours from chicken wire.)  This bit isn’t recommended for kids as the wire can be sharp.
Candle holder for the lantern
Candle holder:  make a small cylinder shape from chicken wire and attach the ends together so the shape doesn’t spring apart  - Use wire or just bend over parts of the chicken wire.   

Snip the chicken wire apart, from the bottom of the cylinder upwards about a third, and bend some of these bits inwards to create a bottom. 

Put a tinfoil pie case in the bottom or just create a lining at the bottom with tinfoil – this is to stop any wax from dripping into the bottom of the lantern.

How to make a paper Fish Lantern
Make a ring which defines the shape of the body.
 Making the lantern frame:  Make a ring with withies/bamboo that is going to be the fattest part of the fish’s body.  Ours were about 20cm in diameter.  Overlap the ends of the withies/bamboo and tape with masking tape to hold.

How to make a paper Fish Lantern - frame
Cut 6 lengths and attach them near the end.
  Cut 6 lengths of withy/bamboo that will be the length of the fish including the tail.  Remember that the finished shape will be curved so take this into account when cutting the length i.e. make them a bit longer. Ours were about 80-90cm long.

Attach these long lengths together 15-20cm from one end.  This end bit will eventually make the tail.

How to make a paper Fish Lantern - frame 2
Fit the rig inside the long lengths, towards the tail.
 Open the lengths and insert the ring inside.  Use masking tape to attach the lengths evenly around the ring.  (It works well to have 2 rings to form the body, but as we had 200 to make, we had to lose the other ring for speed.) Position the ring in the back third, as later, we will add the candle holder in the front third.
How to make a paper Fish Lantern - frame 3
Join the long lengths together to make a fish shape.
 Join all the lengths at the other end with masking tape (and wire for extra strength if needed), as in the picture, and now you have a fish with a body!
How to make a paper Fish Lantern - frame 4
How to make a paper Fish Lantern - frame 5
Strengthen the tail shape.
 Making the tail:  The tail helps stability when the lantern is placed on the floor, so a useful part of the design:  Fan out the tail withies/bamboo so they radiate evenly.  Cut every other one a bit shorter so they should be long, short, long, short etc.  Use 3 short withies/pieces of bamboo to join up the longer ones, catching the short ones at the base of the curves. Refer to the picture if unsure as this is a bit hard to describe. Use masking tape to secure.

How to make a paper Fish Lantern - candle holder

Attach the candle-holder with wire.


 Attaching the candle holder:  Let your fish sit on the floor and turn it round to see where the ‘top’ is.  Ideally it should sit on the floor without rolling around, but the withies/bamboo orientated so that there are 2 struts over the top-most part (rather than 1).  Just keep turning it until you find this place.   

You ideally need 2 struts over the top to wire the candle holder to – see photo.  If you have the candle burning directly under a strut there is a danger it might start to char and burn, so best avoided if you can.  Wire your holder into the frame, like the photo.
How to make a paper Fish Lantern - base layer
Cover the whole lantern in cling film - not totally necessary but makes it easier to attach the tissue paper.
 Covering the frame:  When working with small or inexperienced hands, I find it useful to cover the frame with cling film first, before covering with tissue paper.  This just gives a base to attach the tissue paper to, but is not strictly necessary.  Adults may want to help with this bit, or avoid it all together!

Then the messy part begins!  Tear the wet strength tissue paper into pieces small enough for your lantern and set aside. Water down pva glue and use old paint brushes to apply it to the tissue paper. 
Apply glue to the tissue paper then glue onto the lantern.
Stick it onto the lantern overlapping the edges of each piece until the whole lantern is covered.  You might have to balance the fish on the end of its tail so you can apply tissue all the way round.  

You only really need one layer if using cling film underneath, but if avoiding cling film, put 2-3 layers on for strength.  I'm sorry I don't have better pics of this bit, but it's quite messy and hard to get the camera out!

Our workshoppers added some fun colours to finish the fish off, but they look very effective just plain.  They will need to be left a few hours to dry.

How to make a paper Fish Lantern - Finished items


The last thing to do is to cut out a whole above the candle holder, for access, and to provide a vent hole for the heat to escape.  Scissors or a sharp knife works fine.  Once lit, you can hold the fish by the tail, but we found the best handle is to attach a long piece of wire from the nose to the tail and carry it with that.

As with all candles, it’s best not to leave them unattended, especially if the lanterns are being carried by children.

Poster for the 20th Kreol Festival 2005
I was a little nervous with how the Kreol Festival show was going to turn out, as it was a large amount of lanterns that we hadn’t fully rehearsed, carried by children wearing very flammable costumes.  It was also being broadcast live on national TV and being watched in a packed stadium by the president and all the ex-presidents. 

I didn’t need any jellyfish costume-wearing kids catching on fire and running across the pitch thank you very much.  So, much relief was felt when the show was accident free and a spectacular success.  Well done to all those fantastic participants!

 Finally, if you are planning to make bamboo lanterns in a tropical climate, I can recommend storing them well away from termites or other wood loving insects as I’m afraid to say that when I checked in on them a year later (which was a whole other adventure) they had been reduced to a pile of dust.
The fish lantern, apologies for the poor photo!
The lanterns being lit backstage before the show.
 I hope this is helpful for someone, if you'd like to read how to make Jelly Fish lanterns, look here:  Jelly Fish Lanterns - How to make

Tuesday, 16 August 2011

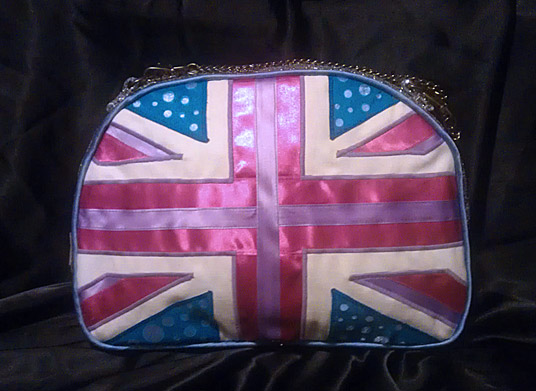
Union Flag Bag

I thought I'd share the new bag I've made for 'Duckie, Best of British'  at the Southbank Centre in London.

It's mostly made from recycled fabric:  The off white base of the 2 side panels is from an old tablecloth, the sparkley sides are off cuts from work and the zip is left over from another project. The polka dot blue fabric of the lining was left over from a 'wishing waterfall' installation I did a few years ago.

Who says all those piles of fabric and off cuts don't come in handy!


They're a bit hard to see but it's got 2 small chain handles, that I also bought for another project but never used.

If you want to see the rest of the (slightly ridiculous) outfit I'll be wearing then you'll have to come along to the event!!

Saturday, 23 July 2011

Red Wooden Heart - French Polishing

The heart will go from bare wood to shiny red!
Now for the fun part - making it shiny!!

By now you should have a 3D heart with all the major sanding done and only surface finishing left to complete.

For the finishing, you will need:
  • The sanding sealer and shellac that you mixed up previously - the recipe and blog post is here.
  • A small dispenser bottle for the shellac , like an eye dropper bottle, (some pharmacies sell them, but it’s not 100% necessary)
  • Fine sandpaper (at least 320 grit) for your orbital sander and sanding block
  • The tack cloths and OOOO wire wool mentioned previously.
  • A clean white cloth or brush for applying the sanding sealer.
  • A small amount of wool or cotton, some 6inch x 6inch pieces of soft cotton (an old t-shirt) for your muneca, and a glass jar with a lid for storing it in.
  • A dust mask for the sanding.
  • Possibly: alcohol (no, not for drinking), FFFF-grade pumice, a salt shaker, pure oil (e.g. Olive oil)

Applying Sanding Sealer
Now it’s time to break out the sanding sealer! Using a clean white cloth or an old brush, apply all over the surface. Pretty hard to do both sides at once unless you’ve found a way to levitate it, so do one side at a time. Let it soak in for 30 seconds or so and wipe off any excess.

When it’s dry (you won’t have to wait long), sand lightly with 320 grit sand paper, or the finest you have, still using your orbital sander. The goal isn’t to remove lots of surface material but just to knock back the grain.

Apply more sanding sealer, let it dry and hand sand from this point on. It’s best to use a sanding block for the flatter bits of the heart, otherwise they might come out a bit uneven.

A new muneca ready to be charged, an old one, and a storage jar.
Make your Muneca!
This is how we’re going to apply the shellac to the heart. The muneca is a wool or cotton core surrounded by a cotton cloth – it’s best if they’re both white, but as long as the dye won’t run when mixed with the meths, then it’ll be fine.

You’re supposed to use real wool to help the proper distribution of the shellac, but I didn’t have any, so cotton wool was a good substitute (I can hear the purists screaming!). A lot of people seem to use old t-shirts for the outside of the muneca, but I used a scrap of soft white cotton fabric.

Put a tight ball of wool (about an inch in diameter, once squeezed tight) in the middle of a 6in x 6in square of soft cotton (old t-shirt fabric is perfect) and gather the corners together so the wool is trapped inside. The inner core will act as a reservoir to dispense the shellac, which is applied to the inside wool core, and squeezed out from the contact pressure with the surface of the work-piece.

Shellac can be a sticky thing to apply and a lot of folks that are masters of French Polishing and make beautiful guitars & furniture recommend that you add a couple of drops of pure oil to the outside of the muneca to assist the application - The oil helps it glide over the surface of the wood.

I’d read that the oil rises to the surface and then needs to be removed by alcohol before moving onto to applying the next layer of shellac, so I decided to see what happened if I left this bit out. All in the nature of experimenting you understand... I found the first 8 coats or so to be very easy to apply, and only after that did I experience the muneca sticking a little bit. I guess on balance, don’t mess with the experts, but if your object is small or an odd shape (i.e. not smooth and flat) then you can probably avoid adding oil.

Shellac Sealing Coat
Wipe the surface dust off with a tack cloth. This is to remove any surface dust so that it’s not trapped under subsequent layers.

To begin applying the sealing coat, make the core of your muneca moderately damp with shellac by applying a good few drops of your 2lb cut. You don’t want to saturate it – too much is not a good thing here! Fold up the corners and slightly twist the end in the outer fabric to make it easier to hold.

Tap it on the back of your hand to evenly distribute the shellac through the core, and then tap on a piece of paper to make sure you haven’t put too much in. You don’t want to leave a puddle of shellac on your wood – the idea is to apply lots of very fine thin layers that amalgamate together.

These first few layers are to act as a base for the rest of the shellac and should be applied along the grain of the wood. I started in the middle at the top and ended at the tip of the heart. You should keep your pad moving the whole time – avoid pausing at the start and finish points, many people recommend a landing and taking off action, like an aeroplane, to start and stop.

Use less pressure when the pad is wetter and more pressure as it runs dry. Replenish with a few more drops of shellac as it dries out.

Wait a few minutes between coats and apply 3 of these ‘sealing’ coats in total. Now, store your pad in a sealed jar and leave your piece to dry thoroughly.

Layering up the first few coats of shellac on the heart.

Using pumice (or not) to fill the grain
Some woods (e.g. rosewood) need to have their grain filled at this point, and this is what I would definitely do if I were using ‘real’ wood (with an open grain) instead of just plywood. As it was, I just rubbed down the surface in between coats using wire wool and I still got a pretty shiny finish.

Obviously this isn’t a purist’s project, as I tend to like to experiment, but if you want a beautiful glass-like finish, instead of one that’s just really shiny, then this is how you achieve it:

You’ll need some FFFF-grade pumice in a salt shaker, a new pad cover, some pure oil (olive is fine) and some alcohol.

Replace your pad cover, add 8-10 drops of alcohol to the core and shake a small amount of pumice onto the surface of the pad. Never apply pumice directly to the wood.

Using random circular motions, work the pumice into the grain, covering a small area at a time. Reapply pumice and alcohol when necessary – you will begin to see a real difference in the surface of the wood. This stage is finished when you’ve gone over all the areas and the grain is filled and the surface smooth.

I might still go back and do this stage just to see what happens – it’s never too late to fill the grain!


You can see the colour and shine developing.

The true French Polish bit
So if you have indulged in filling the grain properly (unlike me, being a renegade), you’ll need to replace the cover on your muneca pad. Add some 2lb cut shellac to the inner core, just like for the sealing coats, and after tapping it on the back of your hand and a piece of paper (like you should every time you re-charge it), start to apply it to the surface of your piece in random movements.

Don’t go with the grain this time, just move the pad all over without pausing or stopping on the surface. The idea is to apply lots of thin layers that will knit together, and the random-ness of your movements helps this. Some people use a figure-of-eight, or oval shape to move their pad in, and I don’t think it matters as long as there’s an even coating on all bits at the end of the day.

I rubbed mine down with wire wool in-between the first few coats, followed by a wipe with a tack cloth to remove surface dust.

You can apply quite a few thin coats at once, but then you should leave it a few hours to properly dry. If you are experiencing the sticky-ness problem and have been using a few drops of olive oil to lubricate your pad, then you should wipe the surface of your piece with alcohol to remove the oil before commencing with the next polishing session. Just charge the core of your pad with a few drops of alcohol and stroking along the grain is fine. This application of alcohol is called Spiriting.

You might have guessed by now that the trick here is LAYERING. A really good shiny finish is made by lots and lots of thin layers of shellac.

So you should repeat the application of layers of shellac, followed by spiriting if necessary, until you get the finish you want. You can see it develop quite quickly, but as you have to leave it between sessions the whole process can take a week or more.

The last few coats develop a deep richness to the colour and shine.
I was happy after about 20 coats, but I lost track of exactly how many coats I applied – it’s easy to get addicted to the shine and the amount of coats becomes irrelevant. Just a few more coats, and it will be perfect…

I considered my heart finished after a good few layers of this last stage, but some people make it even more shiny by applying a few coats of a weaker cut of shellac, a 1lb cut is not unusual. There's lots of different recipes and techniques and more details can be found here:

http://www.scribd.com/doc/57229701/FrenchPolishing-01
http://milburnguitars.com/fpbannerframes.html
http://doit101.com/Woodworking/frenchpolishing.htm

And there's a great French Polishing trouble shooting/ Q & A guide here (with specific reference to guitar-making): http://www.guitarsinternational.com/article.cfm/ArticleContentId/11

The finished heart!

Tuesday, 19 July 2011

Red Wooden Heart - Sanding and filling!

First half pre-sanding.
Right, now you should have 2 separate halves of your heart, some sanding sealer and some polish.

For this next stage you will need:
  • Coarse to fine sandpaper to fit your sander (I prefer aluminium oxide, 80 grit to 320 grit, but surface finishing may require some 400 grit wet and dry paper)
  • A palm sander (random orbital sander), and if you have the luxury of owning one, a detail sander to get in the top crevice.  I don’t have one, and managed ok, but it would have been easier with one.
  • If you need to fill some cracks, then pva glue mixed with wood dust, with a dash of red acrylic, or your more traditional wood filler.
  • A dust mask - wear it when sanding, unless you want to cough sawdust for the next week..
Starting to sand the edges off.
I probably don’t need to say it, as it will become obvious pretty quickly, but if you don’t clamp your work piece, you’ll just be chasing it round your workbench with your sander instead of actually removing surface material.  

I’ve got a cheap workbench, the kind that has holes in the top where you push in plastic stops.  For most jobs it’s a completely useless bit of equipment, but for this, it worked ok. Basically I put stops in around one side and sanded the other side, pushing against the stops, then swapped it round. But anything that prevents the thing moving around will work.

Start with the coarsest sandpaper and work all around the heart, keeping the base plate of your sander flat against the surface. You want to get rid of the steps in-between the layers, making the whole surface flat and smooth.  Graduate up to the finer sandpaper as the surface flattens out and you’re just trying to smooth it off, rather than shape it.

The pink bits are home made filler; pva glue mixed with sawdust & paint.
You’ll probably end up with a few places that need a bit of filling.  Usually I’d use wood filler, but as I know it doesn’t take stain very well, I decided it would be much better to mix my own.   

What I didn’t know was how the coloured polish would react with my home made filler.  I could have tested it of course, but as this whole thing was a bit of a test, I decided just to go for it.

So, I mixed pva wood glue with some sawdust (plenty of that around!), and tinted it with acrylic paint to be pink.  I wanted it to be red, but it turned out more pink due to the pva being white.  Incidentally I did try using some of the wood dye to stain the filler, but it didn't mix well with the pva, so I gave up on that idea.


In hindsight normal wood filler would probably have been ok, as with this method of staining the polish, the colour sits on top of the wood rather than sinking in too much.  If I was staining the wood first and applying a clear polish layer over it, it would have been a different story.  

Well, whatever filling method you choose, it’s time to smooth it on to fill those gaps.  See the photo for the places that I filled – they stand out pretty well, being pink!
One half done, one half just started..
 Then while that’s drying, tackle the other half of the heart.  Yes, more sanding!!  Trust me, it’s all worth it!

When you’ve got both sides filled and sanded to a pretty smooth finish, it’s time to join the 2 halves together!  Use a load of wood glue and leave it overnight to dry, ideally clamped if you can – it’s a tricky shape to clamp, so if that sounds impossible, even wrapping tape round it will help. Double check the edges are perfectly matched before you leave it to dry.

If there’s a slight gap between the 2 halves after joining them, then fill and sand that gap away!  

You should now have a heart that is 3D, with all the major sanding done and only surface finishing to deal with!

The two halves joined together, although it's pretty hard to tell from this angle!
So, you guessed it, surface finishing is covered in the next post!